Tag Archives: how-to

Custom Color Palette for Google AdSense Referrals Ads

Google AdSense for Content and AdSense for Search allow you to create a custom color palette so that the ads can blend or contrast with your page’s color scheme. However, for some reason, the custom color palette can’t be selected for Referrals ads. So, I added the color definitions to the ad code manually.

  1. After creating the Referrals ad, copy and paste the ad code as you normally would. For example, your code might look like the following
    <script type="text/javascript"><!--
    google_ad_client = "pub-xxxxxxxxxxxxx";
    google_ad_width = 250;
    google_ad_height = 250;
    google_ad_format = "250x250_as";
    google_cpa_choice = "CAEadPE0aicm8BvfUaU";
    //--></script>
    <script type="text/javascript"
    src="http://pagead2.googlesyndication.com/pagead/show_ads.js"></script>
  2. Next, add the color codes in the section where all the “google_ad_” variables are. Here’s the same example with the colors added:
    <script type="text/javascript"><!--
    google_ad_client = "pub-xxxxxxxxxxxxx";
    google_ad_width = 250;
    google_ad_height = 250;
    google_ad_format = "250x250_as";
    google_cpa_choice = "CAEadPE0aicm8BvfUaU";
    
    /*** Custom colors ***/
    google_color_border = "FFFFFF";
    google_color_bg = "FFFFFF";
    google_color_link = "336699";
    google_color_text = "333333";
    google_color_url = "336699";
    //--></script>
    <script type="text/javascript"
    src="http://pagead2.googlesyndication.com/pagead/show_ads.js"></script>
  3. Edit the google_color_border (ad border), google_color_bg (background), google_color_link (link/ad title), google_color_text (ad description) and google_color_url (URL text below description) values to the desired colors.

Note that these color codes exist for Content and Search ads. I don’t know why the Referrals ad generator left them out. A person posted on the AdSense Help group that a few months ago, he/she was able to select a custom palette from the generator and asked why it no longer worked. There was no answer yet, so I did this workaround to make the Content and Referrals ads look the same.

Thunderbird Run Now Filters Fail on Custom Headers in IMAP Messages

After updating from Mozilla Thunderbird 1.5 to 2.0, I noticed that a manual filter that I had set up stopped working when I clicked the Run Now button. Today, I found a painless and effective workaround for it.
This problem occurs under the following conditions:

  1. The folder is on an IMAP server
  2. The mail filter contains one or more rules that match a custom header
  3. The filter is run manually by selecting “Run Filters on Folder” from the Tools menu or by going to the Message Filters dialog, selecting a folder from the “Run selected filters on” drop down list and then clicking the Run Now button

Note: Filtering on a custom header will work on incoming IMAP mail, just not when run manually on IMAP folders.

The reason the filter fails is that the filter functionality in Thunderbird 2.0 was changed to search the local cache instead of the server and the cache doesn’t contain custom header information, only the standard headers. This change was made because some IMAP servers either don’t have search capability or their implementation is broken.

So, in order to get the filter to work again, Thunderbird needs to have a local copy of all the message headers. Bug 184490, After-the-fact Filters on custom header (eg “User-Agent” or “Newsgroup”) won’t match for IMAP messages, documents this problem and David Bienvenu, in comment #50, gave a very nice workaround for it.

The workaround simply downloads all the messages with all the headers to the local repository for offline use. Hence, Thunderbird can now see all the custom headers and filter on them. To employ the workaround, simply do the following:

  1. Right-click on the folder you want to filter
  2. Select Properties
  3. Click on the Offline tab
  4. Select the “Select this folder for offline use” checkbox
  5. Click the Download Now button to make sure your local copy is up to date
  6. Click the OK button

Now, when you manually run your filter(s), they work! What a relief it was to find this.

Google Earth’s Flight Simulator Easter Egg

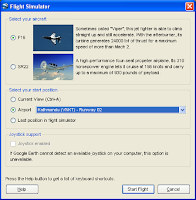
Just saw over at Mashable that Google hid a rudimentary flight simulator inside Google Earth. Pressing Ctrl+Alt+A (Windows) or Command+Option+A (Mac) opens a dialog window where you can select one of two aircraft, your starting location and whether or not you want to use a joystick (keyboard and mouse are also supported).

I had often thought it’d be nice to combine the open-source FlightGear Flight Simulator with the ground imagery of Google Earth/Maps. This is a step in the right direction but it’s hard to say if Google would ever go that far. It’d be nice, though.

Getting Things Done (GTD) Online

Trying to get things done while living in a digital world needs a digital solution. Web Worker Daily had a nice article today called, GTD for Bloggers: The Art of Stress-free Blogging. But it’s not limited to just bloggers. I found that I use some variation of many of these methods to manage my (mostly) paperless life, especially at work. No Daytimer, Moleskin or inked lists of tasks for me. It’s digital all the way, baby.

Show AdSense Only on Post Pages

If your blog covers a variety of topics, the relevance of Google AdSense ads on the main/index page suffers as it tries to figure out what to display. To minimize this problem, you can restrict the ads to the post pages only where the content is more focused. Here’s how to do it on Blogger.

  1. Log into your blog
  2. Click the Template tab
  3. If you don’t already have an AdSense widget on your blog, add one on the Page Elements page
  4. Make a backup of your template by clicking on the Download Full Template link
  5. On the Edit HTML page, select the Expand Widget Templates checkbox
  6. Scroll down to about the bottom quarter of the template contents (the position will vary based on the template you’re using and number of widgets in your blog)
  7. Look for the following widget code (if you have more than one AdSense widget, there will be more than one of these code blocks, each with a different id)
    <b:widget id=’AdSense1′ locked=’false’ title=” type=’AdSense’>
    <b:includable id=’main’>
    <div class=’widget-content’>
    <data:adCode/>
    </div>
    </b:includable>
    </b:widget>
  8. Add the following <b:if> and </b:if> tags so that the widget looks like the one below
    <b:widget id=’AdSense1′ locked=’false’ title=” type=’AdSense’>
    <b:includable id=’main’>
    <b:if cond=’data:blog.pageType == “item”‘>
    <div class=’widget-content’>
    <data:adCode/>
    </div>
    </b:if>
    </b:includable>
    </b:widget>
  9. Repeat for any other ad widgets you have on your blog
  10. Save the template and then view your blog

The contents of the ad widget should now only appear when viewing an individual post.

Note that the Blogger help topic, Page Elements Tags for Layouts, indicates that a widget tag can have a pageType attribute that, when set to “item”, is supposed to display that widget only on post pages. However, it didn’t work for the AdSense widget. So, I added an if condition to the widget’s contents instead.

I’m not sure if pageType was intended not to work on the AdSense widget but, since this technique helps the relevance of the ads, hopefully no one will complain. If you know a better way to handle this or how to get the pageType attribute to work properly for this widget, leave a comment.