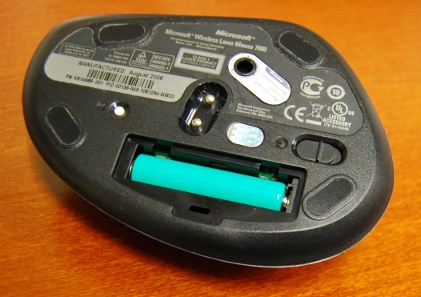
Ran into a situation with a Microsoft Wireless Laser Mouse 7000 that also seems to plague the Wireless Laser Mouse 8000. When placing the Laser Mouse on its charging cradle, the LED on the top of the mouse slowly flashes green for a few seconds, as if it was successfully charging the NiMH battery inside, but then switches to rapidly flashing the LED red.
Taking the rechargeable battery out also results in the flashing red LED. So, the battery is clearly not being recharged. This is further corroborated by the short battery life.

I saw online that some people have found some sort of button underneath the battery and that it’s not being depressed. However, the mouse I was having problems with did not have such a button. There is a small hole under the battery, but no switch or button in the hole.
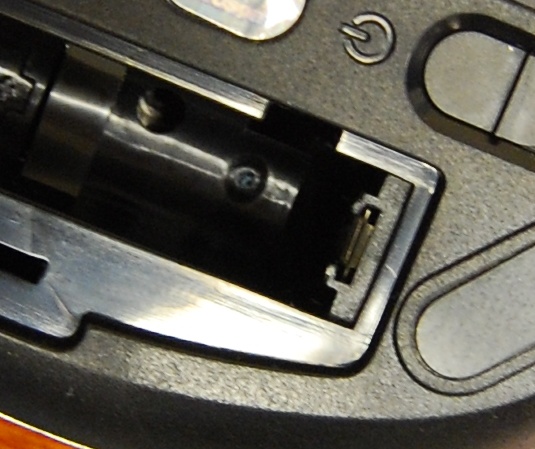
Upon further investigation, I noticed that the positive metal plate in the battery compartment of the mouse has two plastic rails holding it in place.

When putting the battery inside, the rails tend to press back against the top of the battery such that the battery’s tip doesn’t make good contact with the metal. Since the metal plate is tapered inward, it only makes reliable contact with the battery when the battery is pushed all the way down into the compartment.

As a result of this plastic getting in the way and preventing the battery from making contact with the positive conducting plate, of course it can’t recharge. It also explains why it only charges for a few seconds–just until the battery slips out of position and loses contact. However, the fix for this recharging problem is rather simple.

- Cut a small piece of paper a little shorter than the length of the battery and about twice as wide
- Fold the paper in half to achieve a thickness of two sheets of paper
- Place the battery into the battery compartment
- Put the paper on top of the battery
- Close the battery cover
The cover should go on snugly so that it firmly presses the battery into the compartment. That will enable the positive tip of the Laser Mouse’s battery to stay in contact with the positive conductor plate. If it doesn’t press firmly enough, add one more sheet that’s half the width of the first one (for a thickness of three sheets).
After applying this little fix, the problem mouse’s LED properly throbs green and charges up completely.
(Update: Added photos)

If the pulsing never stops, then the rechargeable batteries probably need replacing. If the LED goes solid green, yet the mouse doesn’t work, try the batteries in another device to see if they’re any good. After 200-500 charge cycles, rechargeable batteries tend to no longer hold much of a charge.
*UPDATE* I do agree with a previous poster when he said that if the battery level gets too low, this will also cause the light to flash red when charging. Then you have to keep releasing it from the cradle and placing it back down several times in order for the battery to get a little bit of a charge before it takes over and is able to charge fully on its own without fault. Depending on your usage, I think placing the mouse on the charging cradle about every two weeks will help prevent the battery from being discharged far beyond the point where you will have these charging problems. There really doesn’t seem to be a “perfect fix” for this problem, as some of the suggestions worked for some users, and others didn’t, so maybe this is the only issue standing in the way. Try it and see if it works for you.
This article is so VERY much appreciated. Bought my MS Wireless Laser Mouse just two weeks ago. Same problem (flashing red lights) as described started this week. Was very frustrated and tried to download the MS manual for this mouse but THEY DON’T HAVE IT. They just have the technical details. What a dumb thing for them to do!!! I paid $80 + tax for this, you’d think something so expensive would be design-flawless no?
Anyhow, thanks very much for this post. Was thinking I needed to RMA the mouse but your advice and diagnosis was bang on. Kudos and gracia to you Mr.!!!
Thanks for posting this! It worked on my 7000, too!
I found another way to fix it. Use a tiny, flathead screwdriver and with the battery removed, gently bend the positive contact tab in the mouse toward the battery tip. It wasn’t even a noticable bend, I just flexed it a few times.
Then I popped the battery back in and it charges like it should. Hope that helps!
Good one, Karl!
Just a thought but I don’t think the tab at the bottom is the problem. When you put a normal battery in the mouse not even fully pressed down the mouse still works. Perhaps it is more of a connection problem as others have been saying. No luck with mine yet but still working on it.
For me, this tutorial has worked perfectly. I would like to thank for it, really helped!
The simplest solution to this the 7000 series. is to simply trim off some of the plastic out coat near the terminal end. did it, works like a charm!
I tried the paper trick and it didn’t work for me. My mouse will blink green for a little while longer with the paper inside, but then goes back to a flashing red LED.
I’m not exactly sure what you mean with the tin foil, do you just take a small piece and put it between the positive tip and metal plate? I haven’t tried this yet because I’m afraid of shorting out the mouse.
Any help is appreciated!
If the problem is that the positive battery terminal is too short, then yes you put the foil between the positive tip and the metal plate.
thanks tonne………..that worked for me
I just fixed two of my 8000 laser mice (mouses?). It was a two step process
1/ Shave off a little of the case around the positive (pointy) end of the battery to effectively extend the knob onto the matching contact in the mouse
2/ Run sticky tape laterally around the battery at the positive end to force the metallic switch in the mouse down a little further. I ran the tape around about 6 times.
I suspect that the batteries Microsoft used when setting up these mice were a slightly larger diameter with a longer protruding positive terminal
Nice one! Fixed my problem and saved me alot of hassle. Thanks!
Thank you very much for the tip, my mouse works now perfect!
Brilliant! I was like, “no way, really…?” and you were like “bam! here’s what you need” and I was like “sweet!” … hahaha sorry for the valley girl rant but seriously, THANK YOU! Now on to the economy…
Valley talk? Gag me with a spoon! You’re welcome, Brian. Happy mousing.
Has replacing the stock short terminal green battery with a different rechargable battery been considered? I know, I know, more $$, but I regularly buy NIMH regargables from Harbor Freight for under $10 per 4 pack. For roughly $2 I can get a sing AAA battery with a longer terminal, same charging capacity, and not have to worry about the work around. Was there anything special about the battery that came with the mouse?
Yes, Steve (comment #2) mentioned replacing the battery with one that has a longer (normal?) positive tip. However, there are multiple problems that ended up being expressed in the comments, with associated solutions. Guess I should update my original blog post with a summary of the various issues and their fixes.
It’s amazing how something so simple can fix a problem that’s affecting so many people. Thank you a bunch for this!
Here’s a secondary fix. Mine had problems with the posts contacting the charger. Turned out there’s very little “spring” in the metal holding the prongs up in the charger. My fix is to peel back just enough of the rubber feet on the charger to expose the 4 screws, open it up, and put either a thin bit of soft foam or paper under the prongs. I used a section of a handy coin roll. Put it back together and the paper provides more than enough lift to keep the prongs in contact.
Yesterday I got a refurbished (Geeks) Microsoft Wireless Laser 7000 keyboard and mouse. I followed instructions here because I was getting a flashing red light on my mouse. I decided to insert a regular AAA battery and it worked. My son went out and bought me a new battery. Worked like a charm. Green blinking light on the charger – let it charge for an hour and I’m good to go.
Increible. Muchas gracias.
Thank you so much, this worked like a charm.
Thanks for that tip, it worked for me.