Tag Archives: how-to

Can’t Save PDF Form in Acrobat Reader

Have you downloaded a PDF form that enables you to fill in the fields using Acrobat Reader? Many government forms such as federal and state tax return documents have this feature. Have you ever filled one in only to find that you can’t save all of the data you just typed in? That’s got to be one of the worst “features”, ever. What’s the point of being able to save the file without the data? Here’s a workaround.

The next time you see a PDF form that shows a message such as,

“You cannot save data typed into this form. Please print your completed form if you would like a copy for your records.”

do the following:

  1. Install a PDF printing tool such as the one included with the full Adobe Acrobat package or a free one such as PDFCreator.
  2. Fill in the PDF form as you normally would
  3. When you’re done with the form, print it
  4. Rather than using your default printer, select the one from the PDF tool you installed in step #1

Voila! Now you’ll have a PDF of the filled-in form to save for your records.

Ubuntu 9.04 Screen Resolution/Monitor Out of Range (nVidia Driver 180)

After installing Ubuntu 9.04 Jaunty and enabling the nVidia 180 driver (onboard video is a nVidia GeForce 6150 LE), I restarted the system and was greeted by the normal login screen. However, after logging in, my screen (Dell 2407WFPHC) went blank with a monitor message that the resolution was out of range. It appears that many people are running into this problem. The following fixed it for me.

  1. Open a terminal window
  2. Go to the X11 directory (cd /etc/X11)
  3. Make a backup of the current xorg.conf file (e.g., sudo cp xorg.conf xorg.conf.backup)
  4. Use your favorite editor to open xorg.conf (e.g., sudo vim xorg.conf)
  5. In the section “Device”, add the following line:
    Option “UseEdid” “False”
  6. The “Device” section should now look like the following:
    Section “Device”
    Identifier “Default Device”
    Driver “nvidia”
    Option “UseEdid” “False”
    EndSection
  7. Save the xorg.conf file
  8. Log off and restart the X server (from the login screen, click on Menu and select Restart X server)

That’s it. Now, when I log in, I’m able to see the screen and select a resolution using the nVidia X Server Settings tool.

Note: In the nVidia X Server Settings tool, if when you click the Save to X Configuration File button, you get an error message that it can’t save, run nvidia-settings from a terminal window using gksudo (for Gnome, e.g., gksudo nvidia-settings) or kdesudo (for KDE, e.g., kdesudo nvidia-settings). If, instead, you get a “can’t parse xorg.conf”, just rename /etc/X11/xorg.conf to something else so nvidia-settings can create a new file.

Can’t set your screen to the native resolution of your monitor? See the companion post, Ubuntu 9.04 nVidia Driver Screen Resolution Problem.

Ubuntu 9.04 nVidia Driver Screen Resolution Problem

Many people running Ubuntu 9.04 are having trouble with the proprietary nVidia driver (nvidia-graphics-driver-180 in my case) including getting it to go to high resolutions that fit the native resolution of widescreen monitors. I had the same problem with an nVidia GeForce 6150 LE and Dell UltraSharp 2407WFPHC monitor.

I was able to get all the resolutions, including 1920×1200, for my monitor as well as have the nVidia driver recognize the monitor as a 2407WFPHC, by doing the following:

(If you can’t see your screen at all after enabling the nVidia driver, first read the companion post, Ubuntu 9.04 Screen Resolution/Monitor Out of Range (nVidia Driver 180).)

  1. Open a terminal window
  2. Go to the X11 directory (cd /etc/X11)
  3. Make a backup of the current xorg.conf (e.g., sudo cp xorg.conf xorg.conf.backup)
  4. Run nvidia-xconfig with root permission (sudo nvidia-xconfig). If you get a parsing error, delete xorg.conf so nvidia-xconfig can create a fresh one.
  5. Open xorg.conf with your favorite editor (e.g. sudo vim xorg.conf)
  6. You’ll see a lot of extra settings now
  7. Look for Section “Monitor”. Mine defaulted to the following settings:
    Identifier “Monitor0”
    VendorName “Unknown”
    ModelName “Unknown”
    HorizSync 28.0  – 33.0
    VertRefresh 43.0 – 72.0
    Option “DPMS”
  8. Change the HorizSync and VertRefresh values to the correct ones for your particular monitor. For my 2407WFPHC, I put the following:
    HorizSync 30.0 – 83.0
    VertRefresh 56.0 – 76.0
  9. Save the xorg.conf file
  10. Log out and restart the X server (at the login screen, select Menu, then Restart X server)
  11. Log in and run the NVIDIA X Server Settings tool. You should now have a whole bunch of resolutions from which to choose. I selected 1920×1200.

The reason that this works is that the nVidia driver needs to know the frequency ranges for your monitor in order to know what resolutions are safe to use. Setting the HorizSync and VertRefresh in xorg.conf provides this necessary information.

Microsoft Wireless Laser Mouse 7000/8000 Flashing Red LED & Battery Doesn’t Charge

Ran into a situation with a Microsoft Wireless Laser Mouse 7000 that also seems to plague the Wireless Laser Mouse 8000. When placing the Laser Mouse on its charging cradle, the LED on the top of the mouse slowly flashes green for a few seconds, as if it was successfully charging the NiMH battery inside, but then switches to rapidly flashing the LED red.

Taking the rechargeable battery out also results in the flashing red LED. So, the battery is clearly not being recharged. This is further corroborated by the short battery life.

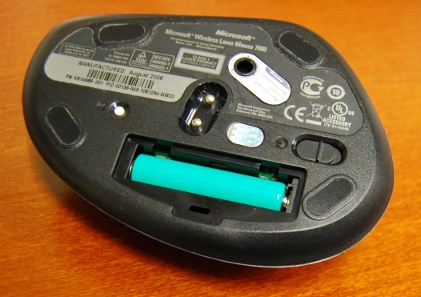
Microsoft LaserMouse 7000 upside-down with open battery compartment

I saw online that some people have found some sort of button underneath the battery and that it’s not being depressed. However, the mouse I was having problems with did not have such a button. There is a small hole under the battery, but no switch or button in the hole.

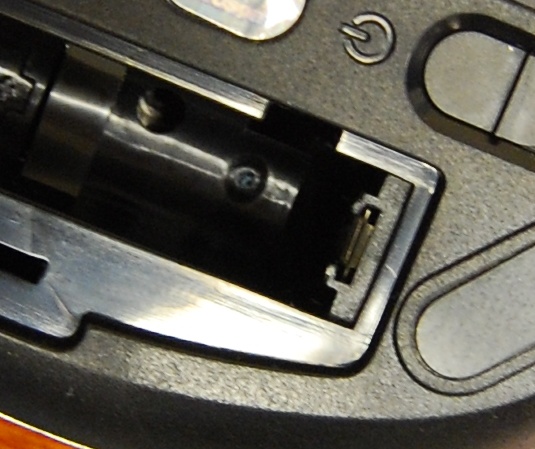
Upon further investigation, I noticed that the positive metal plate in the battery compartment of the mouse has two plastic rails holding it in place.

Battery removed showing the plastic rails at the positive conductor

When putting the battery inside, the rails tend to press back against the top of the battery such that the battery’s tip doesn’t make good contact with the metal. Since the metal plate is tapered inward, it only makes reliable contact with the battery when the battery is pushed all the way down into the compartment.

Notice the short tip on the rechargeable battery and the rails pressing back against it

As a result of this plastic getting in the way and preventing the battery from making contact with the positive conducting plate, of course it can’t recharge. It also explains why it only charges for a few seconds–just until the battery slips out of position and loses contact. However, the fix for this recharging problem is rather simple.

Fold the paper (left); place on top of battery (center); insert into mouse (right)
  1. Cut a small piece of paper a little shorter than the length of the battery and about twice as wide
  2. Fold the paper in half to achieve a thickness of two sheets of paper
  3. Place the battery into the battery compartment
  4. Put the paper on top of the battery
  5. Close the battery cover

The cover should go on snugly so that it firmly presses the battery into the compartment. That will enable the positive tip of the Laser Mouse’s battery to stay in contact with the positive conductor plate. If it doesn’t press firmly enough, add one more sheet that’s half the width of the first one (for a thickness of three sheets).

After applying this little fix, the problem mouse’s LED properly throbs green and charges up completely.

(Update: Added photos)

Redirect Output from Time Command to a File

If you want to find out how long a program takes to execute, you can use the Linux time command. It outputs the real, user and system resources used by the command you specify. For example, to see how long the ls command takes to execute on the current directory, you run time ls and get something like the following:

real 0m0.005s
user 0m0.004s
sys 0m0.000s

However, by default, the time command outputs this information to the standard error device and, as a result, it’s not always obvious how to get this information into a file.

If you’re using the GNU time command, it’s pretty easy with the -o or --output option. For example, the following command writes the time information from executing ls into the file time.log:

time -o time.log ls

On some systems, such as a Linux server I was using recently, the only available time command may be the one built into the shell. This time command does not have an output option. As a result, if you want to redirect the output of both the time command and the program it’s executing, you might think you want to do the following:

time ls > output.log 2>&1

Then, you discover that it doesn’t work as expected. All you get in the log file is the output of the ls command while the time command still prints to the console, even though you redirected standard error to standard out.

Why does this happen? It’s because those redirects apply only to the ls command, not to the time command. Fortunately, there’s an easy solution. Group the time command and the program you want it to time using parentheses. Try changing the previous command to the following:

( time ls ) > output.log 2>&1

When you view the output.log file now, you’ll find that the output of both the ls and time commands went into the log file, as desired.